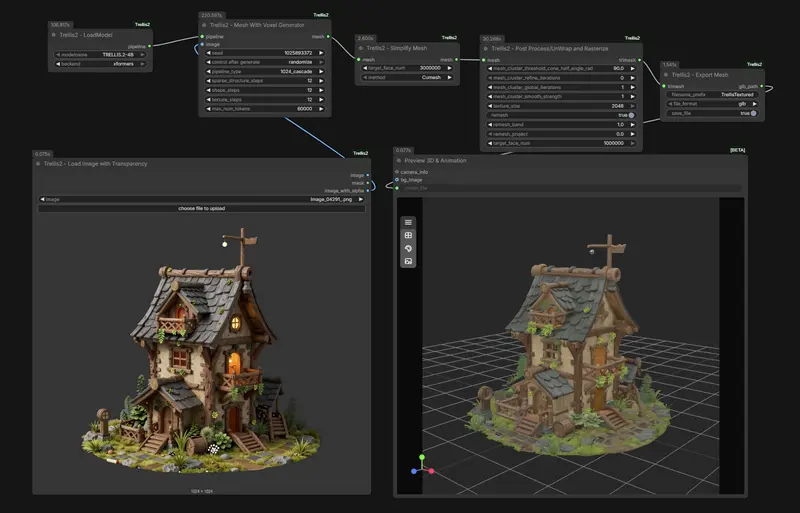
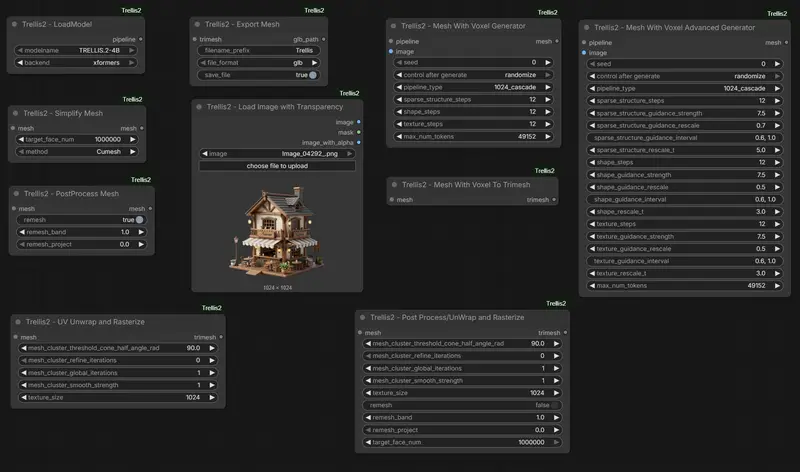
ComfyUI-Trellis2 是开发者visualbruno为微软高保真3D 生成模型TRELLIS.2打造的ComfyUI节点。该节点允许用户通过图像输入,直接在 ComfyUI 工作流中生成带完整 PBR 材质的 3D 资产(支持透明度、任意拓扑结构等)。
- GitHub:https://github.com/visualbruno/ComfyUI-Trellis2
- 网盘:https://pan.quark.cn/s/00a2eac1e2cc 提取码:87qP
⚠️ 注意:相比其他 ComfyUI 节点,Trellis2 节点安装较为复杂,需手动配置依赖与模型。
系统要求
- 操作系统:Windows 11(开发者已验证),Linux / macOS 可能需自行编译依赖
- Python 版本:3.11
- PyTorch 版本:2.7.0 或 2.8.0(需与 CUDA 版本匹配)
- CUDA:建议使用
cu128(CUDA 12.8) - 额外依赖:必须能访问 Facebook DINOv3 视觉模型(用于图像特征提取)
模型准备
TRELLIS.2 依赖 DINOv3-vitl16 作为图像编码器。您需要手动下载该模型并放置到指定目录:
1. 下载模型
访问 Hugging Face 页面:https://huggingface.co/facebook/dinov3-vitl16-pretrain-lvd1689m
⚠️ 注意:该模型需登录并同意 Meta 的使用条款才能下载。
2. 放置模型文件
将下载的整个模型文件夹(包含 config.json、pytorch_model.bin 等)放入 ComfyUI 的模型目录:
ComfyUI/models/facebook/dinov3-vitl16-pretrain-lvd1689m/
确保路径结构正确,否则节点将无法加载视觉编码器。
安装步骤
1. 安装主节点
通过 ComfyUI Manager 或手动克隆节点仓库到 custom_nodes/ 目录:
cd ComfyUI/custom_nodes
git clone https://github.com/visualbruno/ComfyUI-Trellis2.git
2. 安装预编译 Wheel(关键步骤)
由于 TRELLIS.2 包含 CUDA 扩展,必须安装匹配的预编译 wheel。开发者提供了针对不同 PyTorch 版本的二进制包:
对于标准 Python 环境:
- 如果使用 Torch v2.7.0:
python -m pip install ComfyUI/custom_nodes/ComfyUI-Trellis2/wheels/Windows/Torch270/cumesh-0.0.1-cp311-cp311-win_amd64.whl

python -m pip install ComfyUI/custom_nodes/ComfyUI-Trellis2/wheels/Windows/Torch270/nvdiffrast-0.4.0-cp311-cp311-win_amd64.whl

python -m pip install ComfyUI/custom_nodes/ComfyUI-Trellis2/wheels/Windows/Torch270/nvdiffrec_render-0.0.0-cp311-cp311-win_amd64.whl

python -m pip install ComfyUI/custom_nodes/ComfyUI-Trellis2/wheels/Windows/Torch270/flex_gemm-0.0.1-cp311-cp311-win_amd64.whl

python -m pip install ComfyUI/custom_nodes/ComfyUI-Trellis2/wheels/Windows/Torch270/o_voxel-0.0.1-cp311-cp311-win_amd64.whl
- 如果使用 Torch v2.8.0:
python -m pip install ComfyUI/custom_nodes/ComfyUI-Trellis2/wheels/Windows/Torch280/cumesh-0.0.1-cp311-cp311-win_amd64.whl

python -m pip install ComfyUI/custom_nodes/ComfyUI-Trellis2/wheels/Windows/Torch280/nvdiffrast-0.4.0-cp311-cp311-win_amd64.whl

python -m pip install ComfyUI/custom_nodes/ComfyUI-Trellis2/wheels/Windows/Torch280/nvdiffrec_render-0.0.0-cp311-cp311-win_amd64.whl

python -m pip install ComfyUI/custom_nodes/ComfyUI-Trellis2/wheels/Windows/Torch280/flex_gemm-0.0.1-cp311-cp311-win_amd64.whl

python -m pip install ComfyUI/custom_nodes/ComfyUI-Trellis2/wheels/Windows/Torch280/o_voxel-0.0.1-cp311-cp311-win_amd64.whl
对于 ComfyUI Portable 版本:
- 如果使用 Torch v2.7.0:
python_embeded\python.exe -m pip install ComfyUI\custom_nodes\ComfyUI-Trellis2\wheels\Windows\Torch270\cumesh-0.0.1-cp311-cp311-win_amd64.whl

python_embeded\python.exe -m pip install ComfyUI\custom_nodes\ComfyUI-Trellis2\wheels\Windows\Torch270\nvdiffrast-0.4.0-cp311-cp311-win_amd64.whl

python_embeded\python.exe -m pip install ComfyUI\custom_nodes\ComfyUI-Trellis2\wheels\Windows\Torch270\nvdiffrec_render-0.0.0-cp311-cp311-win_amd64.whl

python_embeded\python.exe -m pip install ComfyUI\custom_nodes\ComfyUI-Trellis2\wheels\Windows\Torch270\flex_gemm-0.0.1-cp311-cp311-win_amd64.whl

python_embeded\python.exe -m pip install ComfyUI\custom_nodes\ComfyUI-Trellis2\wheels\Windows\Torch270\o_voxel-0.0.1-cp311-cp311-win_amd64.whl
- 如果使用 Torch v2.8.0:
python_embeded\python.exe -m pip install ComfyUI\custom_nodes\ComfyUI-Trellis2\wheels\Windows\Torch280\cumesh-0.0.1-cp311-cp311-win_amd64.whl

python_embeded\python.exe -m pip install ComfyUI\custom_nodes\ComfyUI-Trellis2\wheels\Windows\Torch280\nvdiffrast-0.4.0-cp311-cp311-win_amd64.whl

python_embeded\python.exe -m pip install ComfyUI\custom_nodes\ComfyUI-Trellis2\wheels\Windows\Torch280\nvdiffrec_render-0.0.0-cp311-cp311-win_amd64.whl

python_embeded\python.exe -m pip install ComfyUI\custom_nodes\ComfyUI-Trellis2\wheels\Windows\Torch280\flex_gemm-0.0.1-cp311-cp311-win_amd64.whl

python_embeded\python.exe -m pip install ComfyUI\custom_nodes\ComfyUI-Trellis2\wheels\Windows\Torch280\o_voxel-0.0.1-cp311-cp311-win_amd64.whl
📌 提示:
- 所有 wheel 文件位于节点仓库的
wheels/文件夹中- 若无匹配版本,可能需要从源码编译(不推荐新手尝试)
© 版权声明
文章版权归作者所有,未经允许请勿转载。
相关文章


暂无评论...